IRCommand2 -- Application Notes
This page contains usage notes intended for advanced users of IRCommand2. Click on a topic to expand it.
AppNote 01 - Critical File Backup and Restore (Updated - 8/3/17)
It's a good idea to create a backup of your device/button configuration since for most users it can take a long time and a lot of effort to recreate it if it's lost! This application note shows you how to locate and identify the important files to back up. It also provides the procedure for restoring your setup.
The files to be backed up are:
- Configuration File - Use the
File>Backup/Restore/Backup function to make a backup copy
of your button configuration.
To manually copy the file you need to locate the correct file. There is a single configuration file for the device/button layout whose name depends on the user's level of registration, as follows:
- Full Registration: the file is called IRCommand.cfg
- Lite Registration: the file is called IRCommandLite.cfg
- Demo: the file is called IRCommandDemo.cfg
The configuration file resides in the program data folder. The location of the data folder depends on the version of Windows, as follows:
- Windows XP or older - the data files are located in the program installation directory: C:\Program Files\WDPS\IRCommand2
- Windows Vista/7/8/10 - the data files are located
in: C:\ProgramData\WDPS\IRCommand2
The ProgramData folder is normally hidden so you have to change a Windows Explorer option to see hidden files in order to navigate to it. Go to menu item Tools then Folder Options and select the View tab, then enable the "See Hidden Files" option.
NOTE: If your system drive is C: then you can just copy the folder path shown above and paste it into the File Explorer address bar (Ctrl-V to paste). This approach eliminates the need to change folder options.
- Registration Key - If you're registered then you can
also copy the
registration key file: IRCommand.wdps, which
resides in the data folder.
If you lost your key file just contact support@wdpsoftware.com with your name and original email address and we can re-send your registration key and ID.
- SignalPaks / Templates / Device Sets - If you created SignalPaks, Templates, or Device Sets then they're located in sub-folders of those names under the data folder.
If you're moving your entire setup to a new PC or are re-installing your system from scratch then the simplest approach is to just copy the entire ProgramData folder.
Note: References to the "C" disk drive above are based on the default installation drive. Use the drive letter you chose when installing the software.
If you ever need to do a restore then follow this procedure:
- If your system was completely rebuilt (OS reinstalled) then first download and install the latest version of IRCommand2.
- Start the program and then restore your registration. If you didn't save the key and ID then contact us to get it re-sent to you.
- Shut down the program after setting up the registration.
- Reinstall dongles. Most dongles require drivers - check our downloads section for the correct driver.
- Start the program and add the dongles via Setup>Dongle Setup.
- Use the File>Backup/Restore>Restore function to restore a prior backup of your button configuration.
- Copy your custom SignalPak, Device Set, and Template files, if any, to the corresponding data sub-folders created by the program install process.
- Restart the program and then check Device Properties for each device tab and ensure that they reference the correct dongle or dongles.
AppNote 02 - Button Layout Tip
Buttons not lining up when you drag them from the button kit? Here's the way to do it:
- Drag the desired button from the kit and drop it anywhere within the device panel. It must be completely within the panel or it will not be created.
- Now press and hold the CTRL key and drag it again to where you want it located. This mode of dragging uses a snap grid to simplify alignment of buttons. You can re-position any existing button in a device panel by holding the CTRL key and dragging it with the mouse.
- New with version 3.72 - the status bar now shows you the x/y position of a button during dragging to further help with getting buttons lined up.
AppNote 03 - Using Stategroups
What is a Stategroup?
A Stategroup is a group of buttons in which there is always one button that remains in the depressed or "on" state. The "on" button represents the current state of the Stategroup and is typically the last button clicked in the group. A Stategroup is useful for tracking the current state of a device, such as whether it's powered on or the last input it had selected.
Tracking capability is important mainly if you're creating macros to perform complex tasks. For example, you might want a button to make your Home Theater system ready to play a movie. In doing this it would be nice to power on any devices (the A/V receiver, DVD, and the TV) that may be off at the time. With a simple power toggle button it's not possible for the macro to reliably turn on the devices since it doesn't know their current state. If power is tracked for each device with a 2-button Stategroup then the macro simply clicks the "ON" button of the Stategroup. If the device is already on then nothing happens, otherwise the Stategroup shifts to the "ON" state and sends the command to turn on the device.
How do I add a Stategroup to my setup?
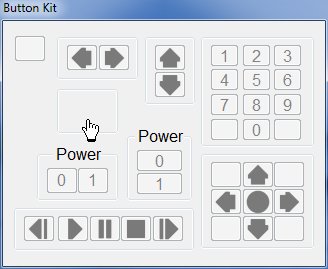
Just drag a Stategroup from the Button Kit to add it to your device. The Button Kit includes a choice of a vertically and horizontally oriented Stategroups that appear as follows:


The default configurations are 2-button Stategroup that could be used to track the power state of a device. To track more states just add more buttons. Right-click on the Stategroup border (not in a button) and select "Increase State Buttons" to add a button. As with other button groups you can modify the labels and other properties of the Stategroup and its buttons.
 You can add up to 8 buttons to a Stategroup.
How do I set up a Stategroup to control my device?
Stategroups have the most properties of any other object in IRCommand2, but only one of its unique properties is needed to make it work in most cases. If you have only a toggle or "next" command for the device on your remote, which is typical, then that command should be trained into the "Command - Shift to Next State" property of the Stategroup. For each single step shift in state the Stategroup will then send the command you have trained. For example, to track the power state of a device using a 2-button Stategroup, just train the power toggle command into the "Command - Shift to Next State" property of the Stategroup.

If the Stategroup has more than two buttons and you click a button that causes a jump in state then the Stategroup will send the "Shift to Next State" command as many times as needed to reach the new state. For example, in the Stategroup below, which is in the "0" state, you click "2" then the "Shift to Next State" command will be sent twice -- once for the shift to "1" and then again for the shift to "2". If you then click "0" again one more "Shift to Next State" command is sent out -- the state of a Stategroup always wraps around from the last state to the first state. If there are a large number of states, such as for an input selector, it's desirable to also train the "Command - Shift to Previous State" property of the Stategroup, though this is not required. Doing so simply helps to reduce the number of commands that may have to be sent to reach the newly selected state.

How do I keep a Stategroup in sync with my device?
The best way to ensure that a Stategroup reliably tracks the device state is to always command the device via the Stategroup. As long as the dongle is positioned to reliably deliver IR signals to the devices then the Stategroup should remain in sync.
If you must also use a remote control to operate the device then you might be able to use the Tracker properties to help keep the Stategroup in sync. Using Tracker properties requires a dongle that supports Listen Mode and that is configured so that IRCommand2 can "hear" all commands that are issued by external remote controls. If your hardware can support those requirements then simply program the "Tracker - Shift to Next State" property with the same signal used in the "Command - Shift to Next State" property (and likewise for Previous if you use it). Whenever IRCommand2 hears the shift command issued by an external remote it will then shift the state of the Stategroup to keep it in sync WITHOUT issuing any commands. If the remote also has discrete buttons for setting on/off or input selection then train those signals into the "Tracker - Shift To This Button" property of the corresponding buttons in the Stategroup (see button properties, below).

Caveat: tracking cannot be 100% reliable due to noise and other factors. Even though IRCommand2 hears the signal it has no way of knowing whether the device also heard it. And it's also possible the device will hear the command but IRCommand2 will miss it. One way to improve tracking reliability is to use an infrared distribution system that feeds a roughly equivalent strength signal to all devices as well as to the IRCommand2 dongle.
Tip: if your Stategroup is out of sync with the device you can manually "track" it to the correct state. Just hold the Ctrl-Shift keys and click on the correct state button. The state will shift without sending out any commands. This manual tracking can be done without entering Learn Mode.
What else can I do with Stategroups?
Stategroups enable more sophisticated control through the use of "Activators", which basically allow the equivalent of conditional programming statements in macros. All devices, groups, and buttons in IRCommand2 support the definition of Activators (as of v3.91). The Activators property is simply a list of state buttons (i.e., buttons in Stategroups). If, for example, Activators are defined for a button then all of the specified state buttons in the Activators list must be in the ON state for the button to be active. An inactive button will ignore all button clicks regardless of whether the request comes from the user, a macro, or the COM interface. An inactive device or group disables all of the buttons and groups that it contains.
Device activators (new in v3.91) enable the creation of device "overlays" that can significantly alter the response of IRCommand2 depending upon the state of your system. For example, it would be possible to create an intelligent remote that maps buttons to the correct device "overlay" for controlling the DVD player when your Home Theater system is set to show a movie, but the same buttons control the DVR instead when the system is set to watch TV. There are many other possibilities depending on what states are tracked.
AppNote 04 - Using the Scope Feature to Determine Signal Quality (Updated - 8/14/13)
When initially training buttons from a new remote it's a good idea to check a signal or two using the Scope feature to confirm that they're ok. But how can you tell? The ultimate test is to try to control the device with the newly trained button, but if you're having problems doing that then the scope is a built-in tool that can help you figure out what's going on. Signals differ in appearance between different remotes, so there's not a universal format to look for, but there are some obvious characteristics of a bad signal.
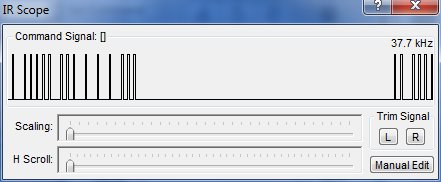
One of the most common causes of improper button training is a failure to have the remote control properly aimed at the dongle when the button to be trained is first pushed. This problem can occur if you're not sure exactly where the remote should be aimed at the dongle and as a result you move the remote around while the button is pushed until you see a response. What often results from this scenario is that the critical initial portion of the signal is lost and you are left with only the "repeat command" signal -- like this:
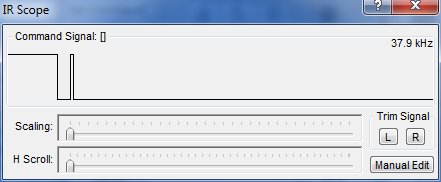
The above signal lacks the initial, critical command signal burst and will not work. To avoid signal training problems become familiar with the pickup location on the dongle and, if possible, place the remote and dongle facing each other on a flat surface.
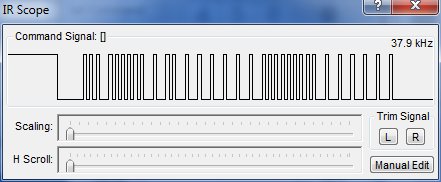
Here's the initial signal burst for the same button used above, but this time it was trained properly:
If this signal were scrolled to the right using the "H Scroll" control on the Scope you would see the repeat marker burst:
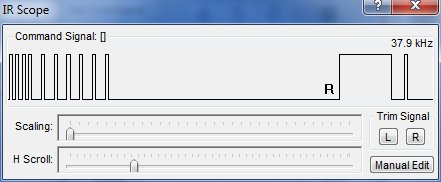
Note also the "R" indicator on the above Scope display - that's a marker that indicates the signal from that point forward is the portion to be repeated.
The following is a similar signal scrolled to the right to reveal the start of another signal "burst". You may see this if you press more than one button on a remote during training, as we did in this example. In this case the lone "spike" that separates the two bursts is not noise but rather an intentional flag to indicate separate command signals. This separator spike is used only internally and is never transmitted.

To show the variability of good signals, here's another example of a good signal from a different remote:
Note that the tail or separation between signal bursts can be fairly long, but the actual data for the command is conveyed by the pulses. So there should be an obvious clustering of pulses that make up each signal burst.
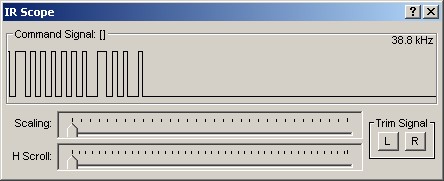
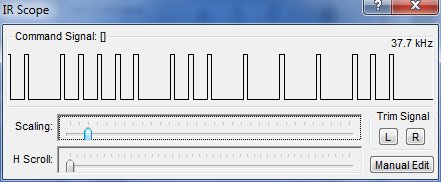
One last example of a good signal:
This signal format uses very narrow pulses and doesn't look "clean", but is correct. Also note that the signal repeats, as you can see the start of a new burst at the right of the Scope display. This type of signal format will typically repeat many times in order to ensure it is properly received. Moving the "Scaling" control to zoom on the signal gives a better view of it:
As you can see, the Scope can be a valuable tool for successful signal training. It can be especially valuable when you're working with a new IR dongle or are training signals from a new remote.
AppNote 05 - Creating and Using Device Sets, Signal Paks and Device Templates (Updated - 8/5/17)
UPDATE: Device Sets are a new feature of IRCommand2. A Device Set basically combines the button layout (Device Template) and signals (Signal Pak) into a single file. A Device Set will add a complete Device tab to your configuration when you load it. To load a Device Set, in Learn Mode right-click on an existing Device tab and select Add Device Set.... With a full registration you can create a Device Set by selecting the Device tab you want to save and selecting File>Save Device As>Device Set... We recommend using Device Sets to save and share your devices. They're easier to use than Device Templates and SignalPaks.
Signal Paks allow users to save and share remote control signals that they've trained for specific devices while Device Templates allow users to save and share button layouts for different devices. These two features can be used together to easily set up new devices. First, load a Device Template to create a new device panel. Then, load a Signal Pak into the new device to train the buttons.
The key to getting Signal Paks and Device Templates to work properly is to set the Button Type property, which is part of the button Appearance properties. Button Type is the key that links a specific signal in a Signal Pak to a button in your device panel. A button must have a Button Type defined or its signal cannot be saved to a Signal Pak. Likewise, a button without a defined Button Type cannot be trained from a Signal Pak.
Notes for creating and using Signal Paks:
- Make sure the important command buttons in your device panel have a Button Type defined before attempting to load or save a Signal Pak. Use a pre-defined Button Type in the property drop list if possible. Setting the type to "[User Value]" causes the button's label text to serve as the type ID.
- Don't mix signals from different devices in a single device panel. A Signal Pak should only contain signals for a single unique device.
- Loading a Signal Pak into a device will overwrite (replace) any existing signals in buttons that are actually trained.
- Signal Pak files should be consistently named. The recommended naming convention is: <Manufacturer> <Device Type> <Device Model>. For example, "Panasonic VCR PV-V4524".
- Signals defined using a UEI code (MyBlaster) cannot be saved to a Signal Pak. The new Set Device Code quick setup feature can be used to quickly set a code for an entire device. As for Signal Paks, this can work only for buttons with the Button Type property defined.
- Signal Paks are created from the File menu. First select the device panel and then execute File > Save Device As > Signal Pak.
- Signal Paks are loaded from the Quick Setup menu item, which can be found under the Setup > Device menu and in the device pop-up menu.
- A few sample Signal Paks can be found online. The simplest way to access these is to select the WDPS Software Online Resources link when browsing for a file to load. Some earlier Windows versions may not show the link in the file open dialog. You can also use File Explorer to navigate to the Signal Paks directory under the program install directory and then double-click the link. Copy the desired files to your local directory and then load them from there.
- If you would like to share your Signal Paks with other users, send them to support@wdpsoftware.com and we will post them to the ftp site.
Notes for creating and using Device Templates:
- In addition to defining Button Type for all important buttons in the device be sure to also define a Device Type in the Device Properties.
- The label for the device panel determines the filename for a Device Template so choose a meaningful name for the device.
- A Device Template will store all button and group layout (size/position) and appearance properties (label, color, etc.).
- Macros can be saved to a Device Template, but all button references outside the device panel being saved will be deleted from any stored macros.
- Device Templates are created from the File menu. First select the device panel and then execute File > Save Device As > Device Template.
- Device Templates are loaded from the Insert New menu item, which can be found under the Setup > Device menu and in the device pop-up menu. Device Templates listed in the menu are standard templates provided with the software. Select Browse to locate Device Templates you have previously saved.
- If you would like to share your Device Templates with other users, send them to support@wdpsoftware.com and we will post them to the ftp site.
AppNote 06 - Continuous Macro Loops
Click delays make it possible to create a macro that executes
periodically for an indefinite period. To do this simply add a click
delay to the end of your macro then click on the macro button being
programmed to add it as the last statement in the macro. If this macro
is clicked once it will then execute continuously at the interval of the
click delay. You must use a click delay for this to work, or the loop
will be ignored.
You can stop execution by opening the Timer Event Schedule dialog
(View/Timer Event Schedule) and then canceling the next execution of the
macro. Exiting and restarting IRCommand2 will also stop macro loops.
AppNote 07 - Remote Control from External Applications
The Basics: Create Your Own Application
It's possible to control devices in your own applications by simply passing the commands through IRCommand2's COM interface. With IRCommand2 version 3.82 it's now even easier to do and requires a minimum of coding.
A simple example of the coding required in VB Script to, for example, turn on the TV might look something like the following:
Set IRC = CreateObject("IRCommand2.App") ' Opens
interface
Rslt = IRC.ClickButton("TV", "Power") ' "TV"=device panel
label, "Power"=button label
Set IRC = Nothing ' Closes interface
Using the new ClickNumber function it's also very easy to set the TV channel:
Set IRC = CreateObject("IRCommand2.App")
Rslt = IRC.ClickNumber("TV", "Channel", "214")
Set IRC = Nothing
In the above example, "TV" is the device panel label, "Channel" is the numeric pad group label, and "214" is the channel to set. The simple examples above use only string literals, but the function parameters can be variables set from any source of data supported by the script language.
Sample #1: Controlling a DVD/CD jukebox from MS-Office
A download is available that provides an example of how to control a DVD/CD jukebox from Excel or Word. In Excel a MacroButton is used to issue the commands. In Word, a Field is used. If your DVD or CD collection is kept in either Excel or Word then you can use the corresponding document in the download to automate control of your player. Requires MS-Office 2003 or later and a registered copy of IRCommand2 (Lite or Full).
Sample #2: Controlling DVD/CD jukeboxes from 3rd party applications
A download is available containing scripts that can enable many 3rd party applications, such as movie or music collection management applications, to control DVD/CD jukeboxes. The only requirement is that the application support execution of an external link.
Link support often does not allow passing parameters and in this application we need to specify a player name and disc number. To get around this limitation a script is provided that will generate a unique link for each player/disc combination. These links can then be used to play the corresponding disc on a specific player. Instructions for setup and use are included in the download package.
The scripts have been tested successfully with Movie Collector™ using its Link feature and Sony 400 disc DVD jukeboxes (special thanks to Juan S. for testing this setup).
AppNote 08 - Remote Control with a Web Browser (Updated - 6/17/20)
Update 6/17/20: As of version 5.96, web access is now integrated into the program! Just enable the feature in Program Options and then direct your browser to "http://<computername>/IRC2Web". (A full registration is required to use this feature.)
Update 9/30/13: Version 1.1 of the ASP page has just been released and is available on the downloads page. This new version has the following enhancements and fixes:
- Icon image set updated to match those in latest release of IRCommand2 (v4.99)
- Tweaks to appearance in different browsers.
Update 1/07/12: Version 1.0 of the ASP page has just been released and is available on the downloads page. This new version has the following enhancements and fixes:
- Improved alignment of text and icons based on browser type
- Button size tweak to improve appearance for button grids
- Shows only device panels that are not hidden
- Colors now set from actual device/button settings
- Tweaks to scale and font settings to avoid text overflow
- Now supports Safari/iPad
- Use of AJAX methods to improve button click performance
- Dropped support for WinCE and obsolete "pocket" browsers with limited capabilities
Update 9/05/11: Version 0.9 of the ASP page released to add the following fixes:
- Tweaks to improve text rendering
- Rounded buttons and boxes
Requirements:
- Registration: You must have a lite or full registration of IRCommand2 since this feature uses the COM interface.
- Web Server: the PC running IRCommand2 must have a web server installed that supports ASP. There are a number of small servers available for free download from various places. We tested with Baby Web Server by Pablo Software Solutions. It's compact, stable, and works with the ASP script. If you are using Microsoft IIS under XP Pro see the note, below.
- ASP Script: free from our download page. The download contains the IRC2_Server ASP page, image files in a subdirectory (for the icons) and some instructions.
- A Local Area Network: you can run the browser on the same PC as the server to test it, but this isn't all that useful as a long-term configuration. A wireless LAN will work here!
Setup Procedure:
- If not already done, install IRCommand2 on the server PC and set it up so it controls your equipment. The install package includes help.
- Install the web server software on the same PC as IRCommand2. Follow the instructions that came with the software. Take note of the root document directory location.
- Unzip the ASP Script download package into the document directory of the web server. The image files should unzip to a subdirectory under the document directory where the ASP page is located.
- If you are updating an existing ASP installation then just install over the old version overwriting old files.
- Set the just-installed ASP script page as the default home page for the web server. If you don't want to do that, then just note the name of the ASP page so you can enter it in step 6, below.
- Make sure IRCommand2 and the web server are both running. The order of startup doesn't matter.
- Start up a web browser on any network-connected PC and enter the address of the server PC. If you're on a private network you'll probably need to enter the IP address of the server PC into the browser's address window. Also, if you did not set up the ASP page as the default home page then you need to append the name of the page to the server address to view it.
- You should now see a rendering of the first device panel in your IRCommand2 setup. If you have multiple device panels defined in IRCommand2 you can move between them by selecting the desired panel using the drop list at the top of the browser page.
- WARNING: if your web server is accessible on the public Internet then anyone calling up the ASP page will be able to control your equipment! You might want to consider at least password locking the ASP page in this case.
Known Limitations:
- The web page will not show the current state of a state group, but clicking on state group buttons does work.
- Text labels may not render exactly as they appear in IRCommand2.
- The latest ASP has been tested and works well with IE v9 or later, Firefox, Chrome, and Safari (tested only on iPad)
Using Microsoft IIS under XP-Pro
If you use IIS (Internet Information Server) then the default user account used for web client access must have interactive user rights. The simplest approach is to use the Permissions Wizard under the IIS Manager (Control Panel, Administrative Tools, Internet Information Services) to configure the web as a "Secure Web". This allows only local users, with interactive user rights, to access the ASP page.
To set up a Secure Web -- in IIS Manager, right click on the web site, select "All Tasks" from the menu and then select Permissions Wizard. Choose "Select new security settings from a template" then select "Secure Web Site". Allow it to replace all directory and file permissions.
AppNote 09 - Using Multiple Dongles of the Same Type
IRCommand2 can support multiple dongles of the same type for both the USB-UIRT and ADS IR Blaster. The trick is to modify the name of the second and subsequent dongles so they are recognized as separate units by both Windows and by IRCommand2. To do this a simple utility is required that updates the firmware ID in the dongle to a different unit number.
- For the ADS IR Blaster the utility program and instructions can be downloaded from our site here.
- For the UIRT, contact support at the UIRT website and request the uurename utility. Or, you can download a copy of the utility from our webiste here. Once renamed you can add the second and subsequent dongles to new dongle slots by specifying the unit number in the "Port" field of the dongle setup.
AppNote 10 - Using the Dongle Emitter Jack (Tira2 and UIRT)
If you're using either a Tira2 or UIRT dongle, you've probably noticed the jack on it. This jack allows you to plug in an IR emitter to expand the IR output coverage of the dongle. In this case, just stick the emitter to the face of the component or place the emitter where it can "see" multiple components (inside a cabinet for instance).
If you're using an IR distribution system to control a complex home theatre setup then you may be able to drive that IR system directly from a Tira2 or UIRT dongle using an adapter. This approach has the advantage that you don't need to place the dongle in view of an IR pickup. Most IR distribution systems will allow more than one pickup input so the dongle does not replace the IR pickup, which you still need for your remote controls.
The following adapter circuit has been tested with a Xantech IR distribution system. The circuit uses a 4N35 to isolate the dongle and IR system from each other. The diode is the key to the adapter working with other IR pickups installed in the distribution system. Any small signal diode should work. Resister values are in ohms.

The V, G, and S output pins should be connected to the matching screw terminals on the Xantech emitter block.
AppNote 11 - Locking Learn Mode in IRCommand2
This otherwise undocumented feature in v3.91 or later enables locking of Learn Mode to prevent unauthorized access to setup. A download contains the required files and instructions.
AppNote 12 - PSR Emulator for the Wintek Wintrax Jukebox Software
This free emulator enables Wintrax to control a multi-disc CD changer via IRCommand2. It does this by emulating the PSR serial interface device. The emulator is limited to controlling one CD changer and like the original Wintrax software it works only under Win95/Win98/WinME. The emulator uses the COM interface so you must have a registered copy of IRCommand2 to use it. Contact us if you're interested in this software.
AppNote 13 - IRCommand2 and Girder
IRCommand2 can be controlled from Girder™ (Proximis) by using the COM interface. You must have either a Full or Lite registration for IRCommand2 to use the COM interface. To use COM with Girder you must load the LuaCOM library into Girder. Check the Proximis web site for details.
AppNote 14 - Using IR Zones
What are zones?
Zones are designated locations or areas in your equipment setup where you would want to direct IR signals.
Why use zones?
Reasons for using zones can vary. One good use of zones is to direct IR output to a specific device. For example, if you have more than one of the same model DVD player then you may have the problem of both devices responding to the same remote control signals. This problem can be solved with zones by directing IR output to IR emitters on each device and connecting those emitters to different zone outputs on the IR dongle. IRCommand2 can then be configured to send to a specific zone to control each device.
How do I implement zones?
First, you need an IR dongle that supports multiple zone outputs. Of the dongles supported by IRCommand2 the UIRT, GC iTach, and Tira2 can support zones. Next, you need IR emitters that connect to the chosen IR dongle and will reach the devices you want to control. In a complex or widely dispersed system an IR distribution system may be needed. The supported dongles have 3 zones.
For the UIRT and Tira2, one zone is the default IR emitter on the front of the unit and the other two zones are output via a stereo jack on the unit (stereo has two outputs). To attach emitters for the two extra zones you'll need to use a stereo-to-mono adapter cable, which splits to two mono outputs. Connect an emitter (or emitters) to each mono output.
The GC iTach requires a special tri-port cable adapter, which splits the output jack on the iTach into 3 separate outputs. This can be purchased from Global Cache and other sources. Plug emitters into each of the three outputs.
Finally, you need to configure IRCommand2 to send to a specific zone for each device. The zone setting in IRCommand2 is specific to each device and so is found in Device Properties. The "Send Zone" property appears in the Advanced tab of Device Properties, as shown below:
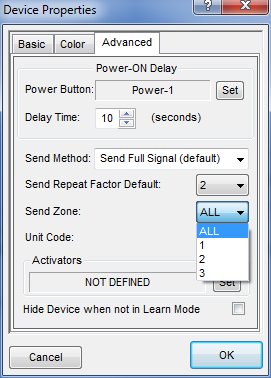
The default is to send to ALL zones. You may need to experiment to determine which Zone number in IRCommand2 corresponds to your intended emitter output.
AppNote 15 - Tip: How to Make Button Label Text More Uniform in Size
When multiple buttons are grouped together variations in the size of the label text among the buttons can make them look disordered. The problem results from labels of varying lengths and the default "best fit" algorithm used to set label text size. There's two options to fix it, one obvious and one that's very easy. The obvious solution is to override the "best fit" size setting under the Button Appearance properties and manually set each button's label so that they look more uniform. The easy solution is to enclose the buttons in a group container and use "Group Buttons Best-Fit Text Size Limit" under Group Appearance properties to make the sizes look more uniform.
Here's a simple example of the problem:
To fix it, drag a group box from the Buttonkit onto the set of buttons and size the group box to surround the buttons. The hand points to the group box in the image of the Buttonkit, below.
Once the group box is properly positioned and sized so it contains all the buttons the next step is to "bind" the buttons into the group, as shown below:
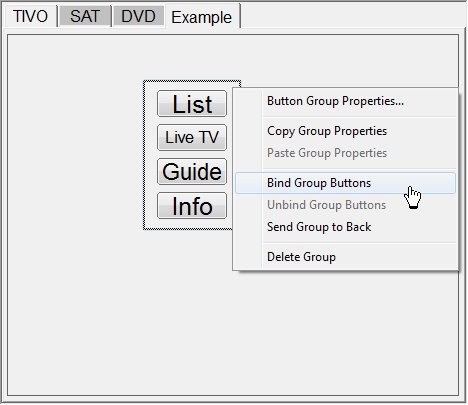
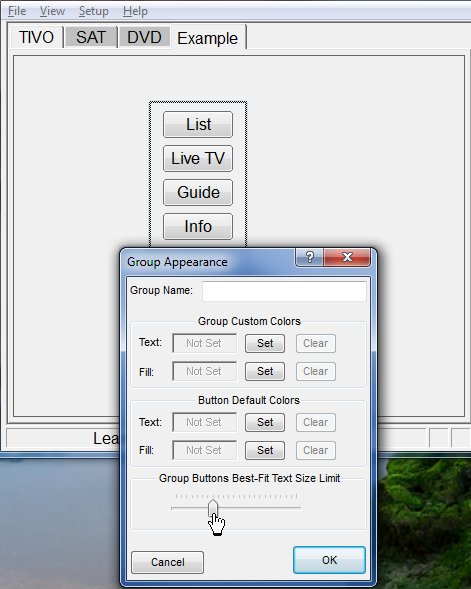
Once the buttons are bound to the group you'll note that if you try to move one of the buttons the entire group will move instead. This is also a convenient way to move a large number of buttons! In this case we're trying to make the labels more uniform so we then select Button Group Properties and then Group Appearance. Now slowly drag the Group Buttons Best-Fit Text Size Limit slider to the left until the labels appear more uniform.
AppNote 16 - How to Manually Enter Signal Data
The most typical way to program a signal into a button is to train it from a physical remote control. But, in some cases a remote may not be available or the desired signal is a "discrete" signal (such as Power OFF) that isn't available from the physical remote control. IRCommand2 provides a way to manually enter signals using either Pronto RAW format or GC-iTach RAW format. The text for those signal formats can be obtained from various sources. Remotecentral.com is one of the most common sources, especially for discrete codes.
Manual entry of signals is done via the Scope dialog. In that dialog simply click on the Manual Edit button if you want to enter a signal in Pronto RAW format or hold Ctrl-Shift and click the Manual Edit button if you want to enter a signal in GC-iTach RAW format. The Manual Signal Entry dialog edit window supports the paste function by typing Ctrl-V.
If a signal is already defined for the button then you will see the appropriately formatted text for that signal in the Manual Signal Entry dialog edit window. If you want to replace the existing signal with a completely new signal then click the Clear button before entering the Scope dialog or select all of the signal text in the Manual Signal Entry dialog edit window and delete it before pasting the new signal text.
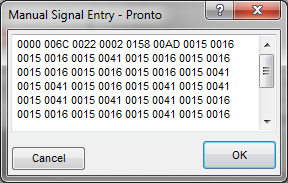
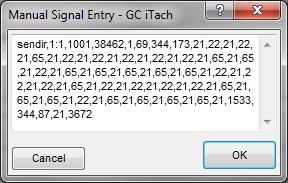
The recommended approach for entering a signal is to copy the signal text to the clipboard (Ctrl-C) from the program being used to view the signal text and then click in the IRCommand2 Manual Signal Entry dialog edit window and type Ctrl-V. It's important that the copied text not include any extraneous characters. There should be a single space separating each 4-digit hex number. There should NOT be carriage returns or other formatting characters in the text. Please note that "cooked" formats are not supported. The Pronto RAW format always begins with "0000"; any other starting value indicates a proprietary signal format, which is not supported.
If the signal entered is not valid for the chosen format then you will hear a short beep when you click the OK button and the dialog will remain up. Correct the error or click Cancel to dismiss the dialog and leave the existing signal, if any, unchanged.
AppNote 17 - Tips for Using "Send Command w/Hold" Button Action
IRCommand2 version 5.4.6 adds a new Button Action called "Send Command w/Hold", which enables continuous sending of a signal when the button is held down. This new feature provides a "slew" effect similar to what most TV remotes provide for volume changes. It works for both IR and X10 signals.
This feature will work even if the button is clicked indirectly via a chain of macros! Just hold down the macro button. There's an option in macro editing to disable the feature for a specific button click - just hold down the Shift key when you enter the button into the macro. It also works via the Firefly remote, which now detects when a button is held down and will pass that information through a Listen Trigger.
Effective use of this feature requires a bit more attention to the signal used and related settings. Here are some tips for getting the best results:
- The trained signal should be as compact as possible. That is, it should not contain duplicate copies of the primary signal burst. The Scope is the best way to evaluate the signal and to trim it if necessary. If the signal has a Repeat portion, as indicated by an R preceding a burst, then ensure that there is only one of those and that it's at the very end of the signal.
- The Send Repeat Factor Default under Device Properties should be set to 0 if possible. If it's not currently 0 then try that setting and confirm that everything still works. If not, keep the original setting.
- Use this Button Action only when needed for a specific function. For example, using it for numeric entry is likely to result in undesired duplicate entries.
- The rate of sending is somewhat dependent upon the chosen dongle's capabilities.
- For dongles that support Zones it is best to select a specific Zone number rather than All in Device Properties. Some dongles, such as the GC-iTach, send the signal separately to each zone when All is selected, which will greatly slow down signal repeat.
- In some cases, it just isn't possible to replicate a remote control's button hold feature for certain functions. For example, it's known that the button hold required to activate the time set function on Bose systems will not work with this feature.
If you're using this feature and have comments or suggestions we welcome your input!
AppNote 18 - How to Train Buttons for Devices that use Toggle-Bit Signals
Some devices use a special signaling format that includes a "toggle bit". These signals contain a data bit that toggles on and off with each distinct press of a button on the remote. The main purpose for this method appears to be to prevent unwanted repeats of a command. If the user presses and holds a button the remote will typically continuously send the same command, but all of the repeated command signals will have the toggle bit in the same state. The device is usually then programmed to ignore repeated commands unless the toggle bit has changed.
If you train signals for a Device with IRC2 and find that you cannot repeat a command (e.g., sending "112" results in "12") then the toggle bit signal format may be the reason. In general, you may find that you must click a different command in between before you can send the same command. For example, sending "1234" will work, but sending "11223344" will result in "1234".
To handle toggle-bit signals in IRC2 you must train each button twice so that the trained signal contains both forms of the command signal. That slightly more complex training procedure along with a change to a Device Property is all that's required.
To train a button for a toggle-bit device using its remote control follow these steps:
- As always, enter Learn Mode to begin training. The fastest way to toggle Learn Mode is by typing Alt-L.
- If the Button Properties sheet is already up then just click on the next button to train. Otherwise, right-click on the button to train and select "Button Properties". If the button action is other than "No Action" or "Send Command" then change it to "Send Command" and then click Set.
- Clear any old signal that may be present in the button by clicking Clear in the “Set Command” dialog.
- Click Train, then push and immediately release the remote control button. Do not push any button on the remote again until the next step. Click OK to save and exit the “Set IR Command” dialog.
- Click Train again, then push and immediately release the same remote control button. Click OK to save and exit the “Set IR Command” dialog.
- Until you're familiar with the procedure we suggest checking your results with the Scope feature. Click Scope. You should see signal bursts separated by a spike, which is used to mark segment boundaries. You may also see extra bursts in each segment preceded by an “R”. Those are repeat signal bursts and are OK to keep.
- Click Save to save and exit the “Set Command” dialog.
After buttons are trained as directed above, a one-time change to Device Properties is necessary to make that training work properly. Under Device Properties, click the Advanced tab and set the Send Method property to “One Segment per Click”. Once that change is made IRC2 will alternate between the two segments with each click of the button.
AppNote 19 - Eliminating Unwanted Duplicate Commands from a Button Click
After training a button you may find that clicking the button results in more than one response from the device. This issue commonly arises with Volume and Channel up/down commands, but it can also occur for numeric entry. For example, after clicking Chan+ you see the TV channel jump by two or more channels instead of one. The basic problem is that the trained button is repeating the primary command in a manner that the device interprets as multiple button presses of the remote. There are two potential solutions to this issue in IRCommand2:
- The trained signal has too many
signal bursts -- If you're seeing the issue with just one or
two buttons then this may be the cause. Some dongles prevent
repeated bursts from being recorded during training, but others will
simply record the signal repeatedly until you release the remote
button. If there are repeated signals then these can be interpreted
by the device as multiple button presses of the remote. To diagnose
this issue, take a look at the signal with the Scope
feature (Button Properties > Button Action > Set > Scope).
It may be useful at this point to take a look at AppNote 4
in this section to better understand what a signal should
look like. If you see multiple command bursts (not the short repeat
bursts) then you can try to trim off one or more of the extra bursts
to see if it corrects the problem. Do this in Scope
by clicking the Trim Signal - R button. This button
will remove a single burst from the end of the signal
each time it's clicked. If you go
too far just close the Scope and click
Cancel to retain the original signal and then try again.
Otherwise, click Save to store the edited signal.
Then test it. You must close the Button Properties
window to test the button.
- Send Repeat Factor Default is set too high -- If you're seeing the issue with multiple buttons in the device then this may be the cause. If a command is repeated too many times the device may interpret that as multiple commands instead of just one. This can be made even worse if the trained signal contains multiple copies of the command burst (see item 1, above). In Device Properties under the Advanced tab check the value for Send Repeat Factor Default. A setting of 0 causes the trained signal to be sent just once (no repeats). Higher values are typically chosen to better ensure that the device sees the command, but in some cases that will cause unwanted duplication of the command. Lower the setting by one step at a time and test to see if the duplication problem has been eliminated.
AppNote 20 - Overriding the Default Web Interface Port Number in IRCommand2 (7/26/21)
The IRCommand2 web service feature uses Port 80 by default, but you can change the default to any desired Port Number. A download contains the required files and instructions for setting a different web Port Number for the web service.
AppNote 21 - Overriding the Default Zone Delay in IRCommand2 (7/26/21)
Zone delay is a feature that ensures there is an adequate gap between sequential signals sent to different devices. This feature is mainly to make macro operation more reliable when multiple devices are controlled. The zone delay typically needs to be longer than the related inter-button delay, which controls the gap between sequential signals sent to the same device. Unlike inter-button delay, which can be uniquely set in Device Properties for each Device, zone delay is set to a global default of 250msecs. You can override this default with a registry setting. A download contains the required files and instructions for setting a different default zone delay.
AppNote 22 - A Refresher on Proper Signal Training Techniques (2/16/22)
If you're having problems reliably training signals then this AppNote may be of some help! Problem symptoms include:
- IRCommand2 complains that the signal is too short - most likely, the remote was not properly aimed at the dongle or moved when the button was pressed, see Rules below.
- The device doesn't respond to the trained button - issue is likely the same as above, see Rules below.
- The device responds only once to the button and then ignores it until a different button is clicked - the device uses a "toggle bit" protocol, see AppNote 18.
- The device responds multiple times to a single button click - see AppNote 19.
- Most dongles use a special low-noise input mode for signal training. This mode requires the remote to be held very close to the dongle's input area - within 1-2 inches.
- Determine and note the optimal placement of the remote relative to the dongle for training. Do this with a test training session that you Clear once done. Enter Train mode, hold down a button on the remote and move it across the face of the dongle at very close range. Keep in mind that some remote buttons don't send continuously. A volume button usually does and is a good choice for this test. Otherwise, just keep tapping a button as you move the remote. When the remote is in the optimal position for training you will see a consistent response indicated by the dongle LED blinking, or movement of the progress bar on the Training dialog. Take note of this position and use if for all subsequent training.
- Keep the remote as stationary as possible in the optimal training position when pressing the button to be trained. This can be challenging for some remotes due to their shape. The best approach is usually to place the dongle and the remote on a table facing each other in the optimal position. This rule is important because many remotes send the critical command signal burst only once when the button is first pressed and then after that they send a stream of short "repeat" bursts. Capturing only the "repeat" burst is a common problem and will result in a "short signal" alert and/or a button that doesn't work.
- If you have any failed attempts while training be sure to click the Clear button before attempting to train again. If a button is trained multiple times wihtout first clicking Clear then the new training data is appended to the existing training. This is a useful feature for some applications, but normally you should clear the old training first. Otherwise, bad signal data from prior failed attempts can remain at the beginning of the button's trained signal. The resulting signal may confuse the device causing no response to the button.
- If you have difficulties following the above rules then there may be other options. Contact us for assistance!